How to Replace Motorcycle License Plate Light: Quick DIY Guide for Delivery Riders (LED Replacement & Legal Tips)
A burned out plate light is a roadside fine waiting to happen when I ride at night. As a delivery rider I treat a dark plate light like a flat tire: fix it fast and keep working. In this guide I walk you through a fast pre check, the exact tools I carry, step by step removal and LED swap, and testing so you do not get pulled over or lose a run. This is hands on, written for riders in the USA who want a cheap, reliable fix in 10 to 30 minutes using parts from Amazon or the shop down the road.
Step 1: Do a Fast Pre-Check - Confirm You Really Need To Replace The Plate Light
Why This Check Matters (Visibility, Fines, Night Deliveries)
I always start with a quick pre check because a dead plate light is not just a tiny annoyance. It cuts visibility of my plate at night. That makes me a target for traffic stops and fines that can cost $50 to $200 or more depending on the state. For delivery work a ticket or a trip back to a shop kills earnings. A fast check saves time and ensures I replace the right part.
How To Test The Light Quickly (Bulb Check, Fuse, Multimeter)
- Turn the ignition to the running or accessory position and switch on the headlights or tail lights. Watch the plate from 10 to 20 feet behind the bike.
- If nothing lights up, pop the fuse panel and check the tail light fuse. A blown fuse is an easy fix and often the real culprit.
- If the fuse is fine, I remove the plate lamp cover and look at the bulb. Burnt filament or black glass means the bulb is dead.
- Want to be sure about wiring polarity? Use a multimeter set to DC volts. With the bike on, probe the power wire and ground. You should see around 12 to 14 volts on the power wire.
When To Replace Versus Repair (Cracked Lens, Corrosion, Wiring Damage)
- Replace the bulb when filament or LED diodes are dead but housing and wiring are intact.
- Repair wiring when connectors are corroded or wires are frayed. Clean or replace connectors instead of forcing a new bulb into bad wiring.
- Replace the whole housing if the lens is cracked, mounting tabs are broken, or water sits inside the unit. A leaky housing will eat new bulbs fast.
Visual: Photo Checklist To Take Before You Start
Before you touch any screws I take these quick photos with my phone:
- Overall view of tail and plate so I know original mounting position.
- Close up of the plate light lens and surrounding screws.
- Photo of wiring colors at the connector or the back of the housing.
These photos save time if I need to buy parts or ask a friend for help later.
Step 2: Gather Tools, Parts, And A Cheap Amazon Shopping List
Essential Tools For Delivery Riders (Screwdrivers, Socket Set, Pliers, Multimeter)
I keep a small pouch with these basics in my top box:
- Phillips and flat head screwdrivers. Small and medium size.
- 8 mm to 12 mm socket or wrench set for common fasteners.
- Needle nose pliers and side cutters.
- A small multimeter for polarity and voltage checks.
- Wire strippers and a pack of heat shrink connectors or butt connectors.
- Electrical tape or heat shrink tubing and a small butane torch or lighter for shrink.
These let me fix almost any plate light issue roadside.
Parts To Buy: Stock Bulb vs LED License Plate Light Replacement Options
Two approaches work:
- Replace the bulb with the stock type if you want the cheapest, fastest option.
- Replace the bulb with an LED or swap the whole lamp to an LED unit for longer life and brighter light.
LEDs draw less current and last years longer, which means fewer roadside fixes.
Choosing The Right LED Replacement (Voltage, Size, Waterproof Rating, Plug Type)
When I shop I check four things:
- Voltage: Must be 12 V system compatible. Most motorcycle electrical systems run 12 to 14 V.
- Size or base: Match the original bulb base such as 1156 or T10 wedge or a screw bolt style used in many housings.
- Waterproof rating: Look for IP65 or higher to avoid condensation and corrosion.
- Connector type: Plug that fits your current connector avoids splicing. If it does not match be ready to splice with heat shrink connectors.
Quick Links And Cost-Saving Tips (Bolt-Style LEDs, Plug-And-Play Kits)
I buy from Amazon when I need a quick replacement. A few reliable picks I have used:
- SEALIGHT 1156 LED Bulb (Single Beam), Price: about $16 for a pair. Compatibility: replaces 1156 P21W bulbs found in many plate lamp sockets. Brightness: around 600 to 900 lumens per bulb depending on model. Ease of fit: direct replacement for 1156 bases: usually plug and play with no extra wiring.
- Auxbeam T10 Wedge LED Bulbs, Price: about $12 for a pack of two. Compatibility: replaces T10 wedge style bulbs used in some small plate lights. Brightness: about 200 to 400 lumens per bulb. Ease of fit: slip in and test for polarity: works in compact housings.
- Putco White LED License Plate Light Bulb 1156 Style, Price: about $20 for a single. Compatibility: direct 1156 replacement, good waterproofing and anti vibration features. Brightness: listed around 600 lumens. Ease of fit: plug and play: often snug in housings.
Prices vary by seller and change over time. I read recent reviews for compatibility with my bike model before buying.
Cost saving tips:
- Buy a two pack so you have a spare on the bike.
- Choose bulbs labeled waterproof or IP65 for wet rides.
- If your connector does not match, buy heat shrink butt connectors instead of a new harness.
Step 3: Remove The Old Plate Light - Step-By-Step Safe Procedure
Prep: Park Safely, Disconnect Battery Or Turn Ignition Off
I park on level ground, set the stand, and remove the key. For extra safety I disconnect the battery negative terminal if I will be cutting or soldering wires. For simple bulb swaps I usually just turn the ignition off and work with the bike cool.
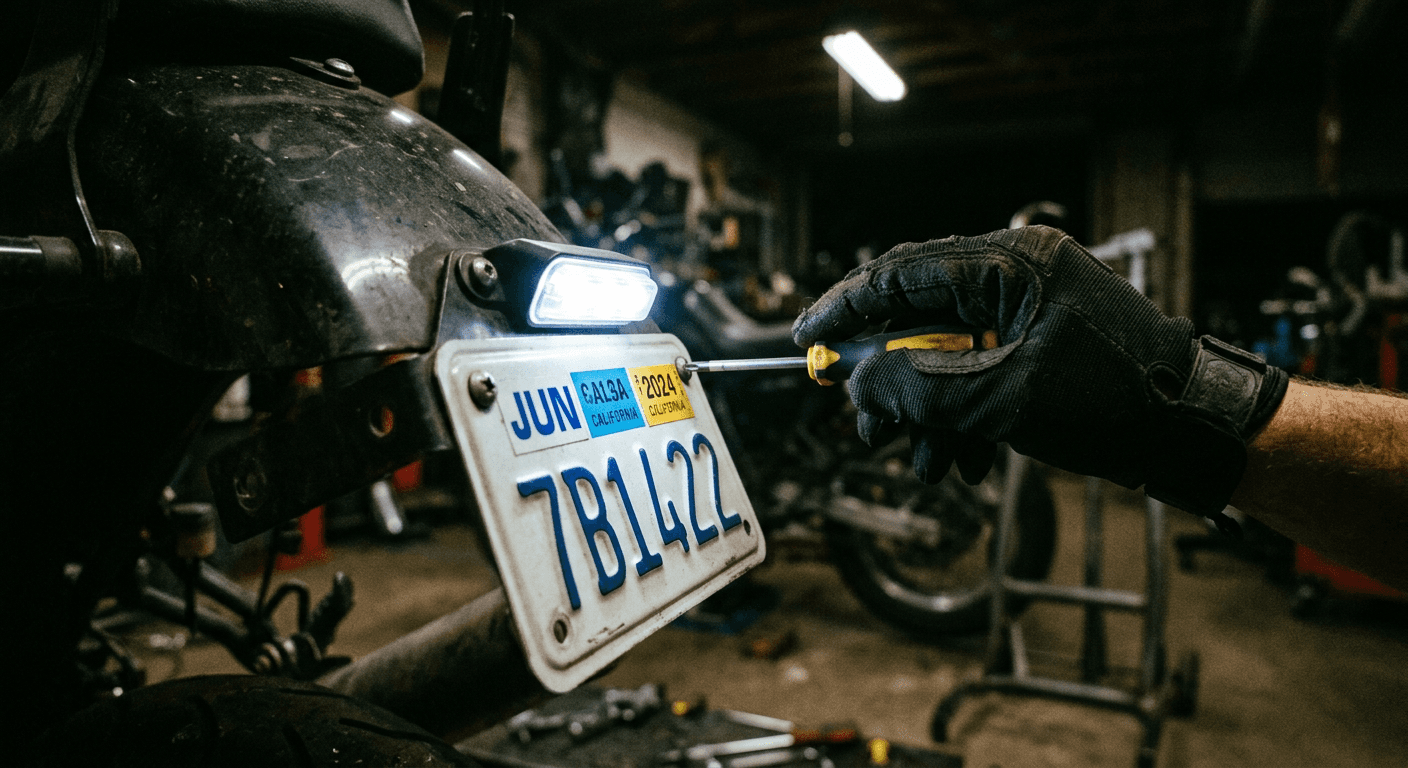
Remove The Plate And Expose The Light (Orderly Fastener Removal)
- Remove license plate fasteners and set them aside in a small magnetic tray or a zip bag.
- If the lamp is mounted behind the plate you can tilt the plate out or fully remove it to access the housing.
- Keep track of trim pieces and the order of screws. I take a quick phone photo so reinstalling is painless.
Unplug Or Desolder Wiring, How To Identify Wires (Power, Ground)
Most plate lights have two wires: a power wire and a ground wire. Typical colors are:
- Black or brown is ground.
- Red or a colored wire is power for the plate lamp.
If you have a connector just unplug it. If wires are soldered, cut them with a small length left so you can identify and reuse the ends. Use the multimeter to confirm which wire shows battery voltage when ignition is on.
Remove Lens Or Entire Housing Without Breaking Tabs
Many housings use plastic tabs that crack if you pry too hard. I do this:
- Use a small flat screwdriver or trim tool and gently press tabs inward while lifting the lens.
- Work one corner at a time to relieve tension.
- If screws secure the housing remove them first. Keep screws in order.
Visual: Close-Up Photos/Diagrams For Common Mount Types
Take close up photos of the housing and wiring before you pull anything apart. These photos are lifesavers when fitting the new LED and when reassembling the mount.
Step 4: Install The New LED License Plate Light (Plug‑And‑Play & Hardwired)
Plug-And-Play Installation (Swap, Test, Refit)
- If the new LED is the same base type, simply insert it where the old bulb sat.
- Reconnect the plug or reattach the connector. If the LED does not light check polarity by reversing the bulb 180 degrees if possible or swapping the wires.
- With the LED seated I turn ignition on and test the light from 10 to 20 feet behind the bike.
- If it works, carefully reassemble the lens and plate, making sure no wiring gets pinched.
Hardwired Installation (Splice, Solder, Or Use Heat‑Shrink Connectors)
- Strip about 1/4 inch of insulation from both ends.
- Use a solder joint for a reliable long lasting connection or use crimp style heat shrink butt connectors for a fast install.
- Slide heat shrink over the joint and shrink it tight for a water resistant seal.
- Re check polarity before finalizing.
Secure Mounting And Sealant Tips To Prevent Water Ingress
- Apply a thin bead of silicone or automotive sealant around the lens edge if the housing is not perfectly sealed.
- Avoid over packing sealant into mounting holes as this can make future repairs messy.
- Ensure the housing sits flush and screws are snug but not over tightened. Plastic tabs crack under too much torque.
How To Wire A Dual‑Function Plate/Brake Light (If Applicable)
Some bikes use the plate lamp as a dual function or have separate circuits. If your plate lamp gets brake feed do this:
- Identify the running light wire and the brake feed wire with the multimeter while a helper presses the brake.
- Use an LED unit rated for dual inputs or wire the LED's running and brake circuits appropriately with diodes to avoid back feed. If you are unsure I recommend replacing with a dedicated dual function LED assembly or visiting a shop.
Visual: Wiring Diagram And Photos For Common Motorcycle Models
I keep simple hand drawn notes or phone photos of the wiring layout for my model. For unusual setups search for your bike model wiring diagram to confirm colors and circuits before splicing.
Step 5: Test, Adjust Aim, And Verify Legal Compliance
How To Test Brightness And Beam Angle For Night Visibility
- Park the bike facing a flat wall or surface at night about 10 to 15 feet away.
- Turn on the lights and look at the plate illumination. The plate should be evenly lit with no deep shadows.
- Walk back to 50 feet and confirm you can read the plate characters. Many states require clear visibility from a distance: aim for comfortable readability at 50 to 75 feet.
Motorcycle Tail Light Legal Requirements (USA), What Delivery Riders Must Know
Laws vary by state but common requirements include:
- License plate must be illuminated by a white light.
- The plate must be legible from a specified distance at night: many states require around 50 to 100 feet.
- The light color must be white and not obscured by tinted lenses.
Check your state DMV for exact numbers. If you ride across state lines, aim for the stricter requirement to be safe.
Delivery Rider Lighting Compliance Checklist (Mount Height, Color, Brightness, Unobstructed Plate)
Quick checklist I run before a night shift:
- White light only over the plate.
- Plate unobstructed by bags or racks.
- Even illumination across the full plate.
- No colored film or heavy tint over the lens.
- Secure mount and no loose wiring.
When To Expect A DOT/DMV Issue And How To Fix It Fast
If a cop tells you the plate is unreadable or the lamp is out you can usually fix it on the spot by replacing a bulb or flipping a plug if you carry a spare LED and basic connectors. If the housing is broken I keep a cheap universal housing in my kit or I swap the whole assembly at a shop to avoid repeated stops.
Step 6: Troubleshooting And Common Problems - Quick Fixes
If Light Still Doesn't Work: Fuses, Switches, Connector Corrosion
- Re check the fuse for the tail or plate circuit. Replace if blown.
- Inspect connectors for corrosion. Clean with a contact cleaner and a small brush.
- Wiggle test the connector while bike is on to find intermittent faults.
Flicker Or Dim LEDs: Grounding Issues And Voltage Drops
- A poor ground will cause flicker or dim output. Clean the ground contact and ensure metal to metal contact.
- Voltage drops from long runs or thin wire can dim LEDs. Use thicker wire or shorten runs where possible.
Lens Fogging Or Condensation: Re‑Sealing And Drainage Hacks
- If condensation forms empty the housing, dry it with compressed air or a hair dryer, and re seal the edges with silicone.
- Drill a tiny weep hole at the lowest point only if the housing design allows and then coat edges with silicone to control water entry.
When To Replace The Whole Housing Or See A Mechanic
Replace the housing if mounting tabs are broken, the lens is cracked, or the internal reflectors are ruined. See a mechanic when wiring issues are beyond simple connectors or when the bike has recurring electrical faults.
Step 7: Maintenance, Best Practices, And Money‑Saving Hacks
Routine Checks For Delivery Riders (Weekly Visuals, Quick Multimeter Test)
I do these quick checks once a week:
- Visual check of plate lighting before a night shift.
- Wiggle the connector to detect loose fit.
- Quick multimeter check for 12 to 14 volts at the lamp when lights are on.
That routine catches most problems before they cause a stop.
Cheap Upgrades Worth Buying (Waterproof LEDs, Anti‑Vibration Mounts)
Spend a little on quality LEDs with water proof casing and anti vibration features. For a few extra dollars you get longer life and less time roadside.
How To Keep Spares Handy And What To Carry On Shift
My on bike kit includes:
- Spare pair of LED bulbs in the right base.
- Small strip of heat shrink butt connectors and a crimper.
- Mini screwdriver set and spare screws.
- Small tube of silicone and a roll of electrical tape.
With that I can fix most plate light problems at the curb and be back on shift fast.
Conclusion: Recap, Quick Safety Reminders, And Next Steps
Recap Of The Quick DIY Steps And When To Seek Professional Help
I walked through checking the light, gathering the right tools and LEDs, removing the old unit, installing the LED, and testing for legal compliance. If wiring looks rotten or fixes do not hold I get a pro to avoid further electrical trouble.
Further Reading And Recommended Products (Amazon Picks For Delivery Riders)
If you need a full replacement assembly instead of just a bulb check my full number plate light article for replacement units and model specific fit guides: Motorcycle Number Plate Light Review: Quick, Compliant LED Replacements For Delivery Riders (USA).
Final safety reminder: always test your plate visibility at night after any repair and keep a spare bulb and basic connectors on every shift. Fix it fast, stay legal, and keep earning.
Our Top Picks
Premium Delivery Backpack
Key Features
- Waterproof
- 40L capacity
- Insulated
Budget Courier Bag
Key Features
- Lightweight
- 25L capacity
- Reflective
Heavy Duty Carrier
Key Features
- Reinforced
- 60L capacity
- Multiple compartments
* Based on extensive testing and real-world delivery experience